I recently talked to a co-worker and they showed me the neat trick of controlling their garage door remotely via a raspberry pi and their cell phone. I found this idea very interesting and I researched it for a few days and eventually came up with my own solution. Here is my guide on how to setup Pi-Watch, my custom mobile optimized web app for controlling your garage doors and viewing camera feeds.
Please note: Links to will contain affiliate links.
General Idea
Connect a Raspberry PI to your garage door so you can view & control it remotely.
It’s a simple concept and can be accomplished over a long weekend, but you will need a few physical items in order for everything to work and a little bit of software.
Required Items
Cameras
I have used both of these cameras and the only real difference, is the camera without night-vision is cheaper, but at night, it will see nothing. The night-vision camera does function at night, but has a reduced vision range.
Raspberry Pi
- V3 Full (The normal sized unit)
- Normal sized USB & HDMI ports
- Easy setup with a keyboard & HDMI monitor
- Pi Zero
- Very small, easy to move around
- Setup is a bit more complicated without a kit to normalize the ports and pins
I have used both and either is fine, but you need to consider your use cases and purchase the one that makes sense for you.
SD Card
I have tested this card with all my raspberry pi units and haven’t experience any problems yet.
Garage Door Opener
This is the device I used for my first attempt. You will eventually break this unit apart and re-wire it to control you’re garage doors. I’ll attach a wiring diagram later in the document.
Relay
This is the component that will actually control the garage opener opener. You can use a larger unit if needed.
Other Items
- Short Wires
- used to connect the pi to the relay. And the relay to the garage door opener.
- Long wires
- Not tested yet, but would be used to check garage door status.
- Sodder gun
- You will need to connect the relay to the garage door opener circuits somehow
- Micro SD Card reader
- If your PC doesn’t have one, something like this would work
- Sodder
- Well, you just need some.
- Wire cutter/stripper
- It will come in handy
- Electrical tape
Software
- Pi-Watch
- This is the software package and other files I’ve been using to setup my Raspberry Pi instances.
- A knowledge of GIT is useful
- Git
- Needed to download Pi-Watch
- To install: sudo apt-get install git
- Raspberry PI Operating Systems
- NOOBS
- This is the easiest way to install your raspberry pi. A setup guide can be found here.
- If you choose Noobs, do not install the desktop version, you want the lite/minimal version.
- The desktop version isn’t desired, since it will slow your PI down.
- RASPBIAN STRETCH LITE
- This is the HARD way. You will need to download the image and write it to your SD card. Here is a guide for setting up the SD card for the hard way.
- On windows after etching the card I was unable to read/write to the card. I had to use my mac to make changes.
- Note: If you have a miniHdmi & miniUsb adapter, you can configure the system interactivity.
- ENABLE SSH: You need to add a blank file named “SSH” to the root of the CD card so you can access the PI via SSH. Make sure the file does not have an extension.
- WI-FI ACCESS: You need to create a new file on the SD card named wpa_supplicant.conf and fill it with the following contents. Please create this file with notepad, notepad++, Visual Studio Code or a simple text editor, do not use a fancy editor like Wordpad or Word.
- NOOBS
country=us
update_config=1
ctrl_interface=/var/run/wpa_supplicantnetwork={
scan_ssid=1
ssid=”your wifi ssid”
psk=”your wifi password”
}
- Putty
- I’ve been using this app on windows to SSH into the many PI’s I have running in my network. I’ve also used free iOS apps to SSH into my PI’s, but just for quick interactions, like shutting them them, because typing is difficult.
- FileZilla Client
- This is a decent utility to transfer files to and from your PI.
Staring out
Well, you need to figure out where you can place your PI and how the cameras will be held in place. What kind of camera do you want to use, is the area always lit?
Note: The camera’s cord is very, very short, so you have to keep the PI and Camera close together.
For positioning I purchased a few electrical boxes and used a 3D printer to create the following camera mount which has served me well, because of it’s flexibility.
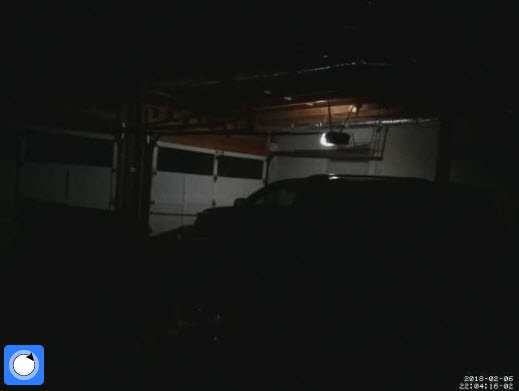
IR Vs NO-IR cameras
Here are a few images from my setup PI instances for comparison. One thing you need to note is the IR camera’s distance at night isn’t very good.


Ordering your parts
Checklist
- Raspberry PI, Case & Power Supply
- Micro SD card / SD card reader
- Raspberry Pi Camera. Night vision is a plus
- Relay Switch
- Relay / PI / Garage Door wires, typically short wires that can be plugged into your PI’s header block
- Garage Door Opener
Assembly
Raspberry PI
Raspberry PI Zero
Garage Relay
WiringPI
Motion
Required Files
Web-server
We’ll use a web-server to view every available camera in one place and make controlling your garage door simpler.
Install
To install Apache 2 & PHP 7.0, use the following command:
sudo apt-get install apache2 php7.0 libapache2-mod-php7.0
Prep
Use the following commands to prepare the web-space for content
$ sudo chown -R pi:root /var/www
$ sudo rm /var/www/html/index.html
Transfer
Use the following commands to download and transfer the Pi-Watch website
cd ~
git clone https://github.com/mgatelabs/PiWatch.git
cp -a ~/PiWatch/www/. /var/www/html
Configuration
In order to configure Pi-Watch you need to edit it’s included customization.php file.
Cleanup
We need to ensure that the PI does not run out of space, so I have a solution where video files older then five days will be erased.
cd ~
cp ./PiWatch/cleanup/find-and-delete ./find-and-delete
chmod 777 ./find-and-delete
Notes
Apache 2 Config File
/etc/apache2/apache2.conf

Спасидо, +
LikeLike